
For porcelain veneer cases, veneer prep design is a meticulous process that requires careful planning, precise execution, and a thorough understanding of the patient’s dental and aesthetic needs. Ensuring case success requires adherence to basic veneer prep guide information. However, it’s important to recognize that there are different types of veneer preparation. Which one to use is dependent on the case goals. Providing the right type of preparation will allow for the correct customization and adaptability to create ideal esthetic results for individual cases.
Step 1: Consultation and Evaluation
The first step in the veneer prep guide is to do a proper patient assessment to get a clear understanding of the patient’s aesthetic and functional goals. This will help determine if porcelain veneers are the most suitable option.
Step 2: Treatment Planning
One step that should not be skipped is to create a diagnostic mock-up. This will take the patient’s goals and create a realistic visual of the desired outcome before veneer prep design. There are several ways this can be done:
- Diagnostic wax-up
- Digital simulation
- Snap-on smiles (various types)
Conduct a smile analysis of the patient’s oral situation to note tooth proportion, the smile line, and facial symmetry. Next, discuss shade selection, which includes shade matching to surrounding dentition, or select a completely new shade if a completely new smile is wanted, depending on the amount of veneers being done.
Step 3: Veneer Prep Design Step-by-Step
Now that the goals of the case are understood, the preparation of the teeth begins. Here are the basic steps in veneer prep design:

1. Choose the Correct Bur for Veneer Prep
The preparation of veneers requires the use of diamond burs. It depends on how much enamel needs to be removed and what shape is needed for preparation on what type of bur should be used. For instance, to achieve a smoother finish, fine-grit diamond burs are often preferred. When reducing enamel, use a round-ended or torpedo-shaped bur in order to create a gentle curvature at the gingival margin.
2. Tooth Isolation
Make sure the working area is dry and clean by using a rubber dam or other isolation techniques. This method makes the veneer prep design process easier and more precise.
3. Initial Depth Cuts
Prepare the tooth surface by making depth cuts to guide the uniform removal of enamel. In general, these cuts are between 0.3mm and 0.5mm deep, depending on the thickness of the final veneer. If you want to ensure consistent depth across the tooth surface during veneer prep design, use a depth-cutting bur with predetermined markers or a silicone index made from the diagnostic wax-up.

4. Enamel Reduction
Using a controlled and steady movement, start reducing the enamel on the facial (front) surface of the tooth. To maintain uniform thickness, keep the bur parallel to the tooth’s long axis. Avoid flat areas or undercuts by following the tooth’s natural contours. It is important to achieve a slightly concave surface for the veneer to bond to during veneer prep design.
5. Interproximal Preparation
Approach the neighboring teeth with care. For a clear margin without damaging adjacent teeth, use a thinner, pointed bur.
6. Gingival Margin Preparation
Create a smooth and invisible margin for the veneer by gently extending the preparation into the gingival sulcus. Take care not to damage the gingival tissue. You can create a strong and aesthetic edge for a veneer by using a chamfer bur around the gingival margin.
7. Finishing and Polishing
Smooth out rough areas with a finer grit bur or polishing bur after bulk reduction. To ensure that the porcelain veneer fits properly, use an explorer or a similar tool to check for undercuts.
8. Cleaning and Inspection
Remove any debris from the veneer prep tooth and thoroughly rinse and air-dry the tooth. Inspect the preparation for uniformity and the smoothness of the margins, and make sure that all areas are shaped properly and ready for impressions.
9. Continuous Water Cooling
In order to prevent thermal damage to the tooth and pulp, make sure that the water is continuously cooled during veneer preparation.
10. Patient Comfort
Check in often to ensure the patient’s comfort during the procedure and inform them what to expect. Check out the AACD Veneer Preparation Guide PDf
The Three Types of Porcelain Veneer Preparations
| Veneer Prep Design Type | Indications for Use |
| No Preparation Veneers | – No more than one color shift in shade – Space between teeth – Lingualized teeth – Slight alignment correction is needed |
| Minimal Preparation Veneers | – Color changes up to 3 shades – Correct medium misalignments |
| Maximum Preparation Veneers | – Major shade changes of 3 or more. – Provides a solution for major misalignment cases – Necessary when redoing old veneers |
No Preparation Veneers
When evaluating a case for a no-preparation veneer solution, it is important to note that only a select few cases will be suited for this type of conservative dentistry. However, when cases do meet the indications for use, it is time to evaluate the advantages and disadvantages of choosing this option:
Advantages of No-Prep Veneers
- Requires very little preparation, making it extremely conservative.
- Achieve a very strong bond by staying in the enamel layer.
- Patients report almost no post-operative sensitivity.
- Patients like the conservative approach
Disadvantages of No-Prep Veneers
- Teeth may appear bulky
- A major shade change does not allow for no-prep veneers
- The inability to create a definitive margin makes seating the veneers very challenging.
No Preparation Design Parameters

- Margin preparation is best at a .3mm chamfer or slightly subgingival
- Facial preparation no more than .5 mm to .7 mm
- Extend the preparation into the interproximal, only going through the contact areas halfway.
- Incisal edge preparation should be .75mm to 1.5mm with a 90º butt joint.
Minimal Preparation Veneers
This preparation design is the most often used type of preparation. It is great when a patient requires a moderate shift in shade or shape of the teeth and moderate alignment corrections. It is not a good choice when patients have large diastemas.
Advantages of Minimal Prep Veneers
- The ability to provide a definite margin to allow for better seating and fit.
- Still able to stay in the enamel layer to provide a very strong bong
- Great for color changes of up to three shades
- The most used type of preparation design
Disadvantages of Minimal Prep Veneers
- It may require exposure of the dentin layer, weakening the bond
- It is not ideal for color shifts of over three shades
- Not ideal for major alignment issues
No Preparation Design Parameters

- Margin preparation should be .3mm chamfer either at or slightly subgingival
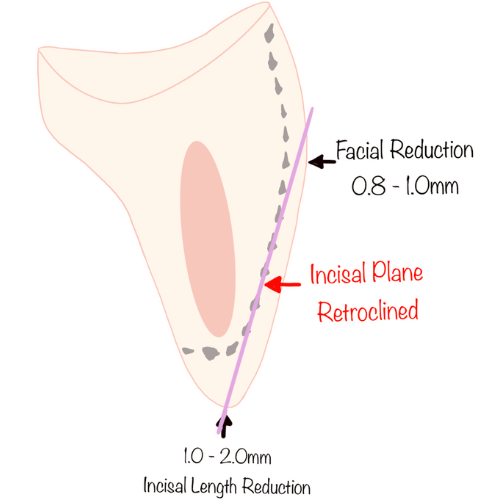
- Facial preparation should be .8mm to 1.0mm
- Extend the preparation into the interproximal, only going through the contacts halfway.
- Prep the incisal facial plane slightly retroclined to allow for the layering of porcelain.
- Create an interproximal cut known as a “dog leg .”The specifics of the preparation are as follows:

As a result of the ceramic restoration, we place the proximal margin toward the lingual. We place the area of the proximal margin between the contact area and the gingival papilla even further to the lingual. Especially when there is a significant shade change in the restorations, this preparation design hides the margin when viewed from an angle. Check the margin at a 45° angle to see if hidden.
Maximum Preparation Veneers
This preparation design is best suited for more aggressive types of changes. This design is needed when a color shift of more than three shades is requested. Also, it is necessary when corrections to tooth alignment are more severe. These types of preparation designs are common for patients who want to correct misaligned teeth without going through ortho.
Advantages of Maximum Prep Veneers
- The more aggressive nature of the prep design allows the room to mask out the underlying color, resulting in color shifts of three or more shades.
- Achieve a definitive margin to ensure great fit and ease of insertion.
- Can correct misaligned teeth
Disadvantages of Maximum Prep Veneers
- More aggressive preparation results in little to no enamel remaining, which can lead to poorer bond strength.
- Patients may be wary of the more aggressive preparation design.
Maximum Preparation Design Parameters

- Prepare a .3mm chamfer margin placed at or slightly subgingival.
- Facial preparation should be 1.0mm to 1.5mm.
- Incisal preparation should be 1.0mm to 2.0mm with a 90º butt joint.
- These types of cases, because they often come with challenges like crowded teeth or a canted midline, will need to use a “slice prep”. This means the contacts are cut through to the cingulum. This should go at least .5mm subgingival.
Make sure to eliminate any sharp edges with all preparation designs.